Laser Module Troubleshooting
This article is a collection of some of the problems or errors that have occurred during the use of Laser tree laser cutting modules. There are a number of checks you can perform when your work encounters a malfunction to try to identify potential problems with working with the laser module, its possible causes, checks you can perform and possible solutions for each problem.
After referring to this article, if you are still unable to resolve the problem, please seek technical support for assistance.
Fault Phenomenon
- The laser module does not emit light
- The laser module always emits light
- The moving path of the laser module keeps emitting light when engraving or cutting
- Laser module cutting performance can not reach the initial state
一、The laser module does not emit light
1.1 Check the software parameters
1.1.1 Check whether the engraving software has set the engraving power correctly
Open Lightburn:

LaserGRBL:

The output power is 0, and the laser module does not emit light
1.2 Hardware troubleshooting
1.2.1 Check the laser module power supply is normal
1.Check the power supply of the laser module
Check whether the voltage and current input to the laser module meet the specified value
|
Laser Module Model |
Power required for full power status |
|
LT-40W-AA |
12V-2A |
|
LT-80W-AA-PRO |
24V-2A/12V-3A |
|
LT-4LDS-V2 |
24V-3A |
|
LT-K30 |
24V-5A |
2.Check whether the power cord is connected correctly
Connect the laser module and perform 100% power engraving in the engraving software to check whether the cooling fan of the laser module is working
Checking whether the fan is working can quickly determine whether the laser module is connected to the power supply
Since some engraving machines have an automatic start-stop function, the power supply of the laser module will be disconnected when not working, so it is necessary to judge whether the laser module is connected to the power line correctly under the working state.
3.Check whether the PWM signal line is connected correctly
Check whether the PWM signal line is in poor contact
When using the adapter board to connect to the external power supply, the PWM and GND (or the mainboard common terminal COM) lines of the engraving board should be connected to the input port of the adapter board, as shown in the figure below

When connecting the engraving machine main board, adapter board and laser module, pay attention to the silk screen of the terminal
(Specifically, you can provide a picture of the engraving main board or the manual of the engraving machine main board for us to check.)

4.Check the voltage of the PWM signal line when it is working
Connect the laser module, perform 100% power engraving in the engraving software, and then use a multimeter to measure the voltage output to the laser module between PWM and GND
(If you use an adapter board for connection, you can directly measure the PWM and GND voltages of the output B terminal)

If the voltage between PWM and GND is 1.5V-12V, consider replacing the laser module driver board
If the voltage between PWM and GND is 0V or above 12V, you need to check whether the PWM wiring is correct and whether the engraving main board is damaged.
You can provide us with a picture of the engraving main board or the manual of the engraving machine main board for us to check.
二、The laser module always emits light
2.1 Hardware troubleshooting
2.1.1 Check whether the PWM signal output is normal
Disconnect the PWM line connected to the laser module

Then connect the rest of the wires to the laser module and turn on the power. If the laser module still emits light, you need to replace the adapter board
(If there is no light, you need to check whether the PWM signal output line is correctly connected to the main board's laser output PWM or spindle output PWM. Can provide a picture of the engraving main board or the manual of the engraving machine main board to help us troubleshoot)
三、The moving path of the laser module keeps emitting light when engraving or cutting
The movement path of the machine keeps emitting light, usually because the laser mode is not set in the engraving software, or the PWM line is not connected correctly
1.Set laser mode
Lightburn
Open Lightburn, click "Edit" - "Machine Settings" - "Read" and change "Laser mode enable ($32)" in the option to true.
LaserGRBL
Open LaserGRBL, click "GRBL" - "Grbl Confiquration" and change the value of "$32" to 1.
Machine modified to laser mode
2.Check the PWM wiring
Check whether the signal output line is correctly connected to the main board's laser output PWM or spindle output PWM.
(Note: You can provide a picture of the engraving main board or the manual of the engraving machine main board for us to check)
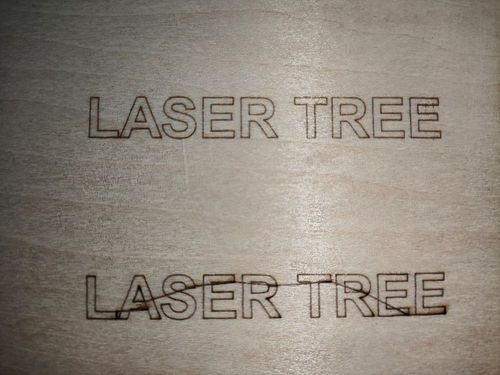
四、Laser module cutting performance can not reach the initial state
4.1 Software parameter troubleshooting
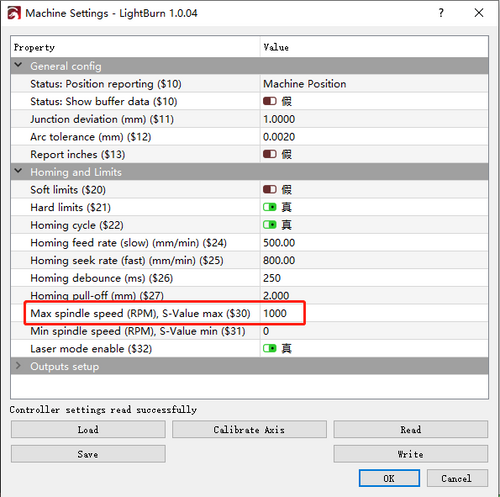
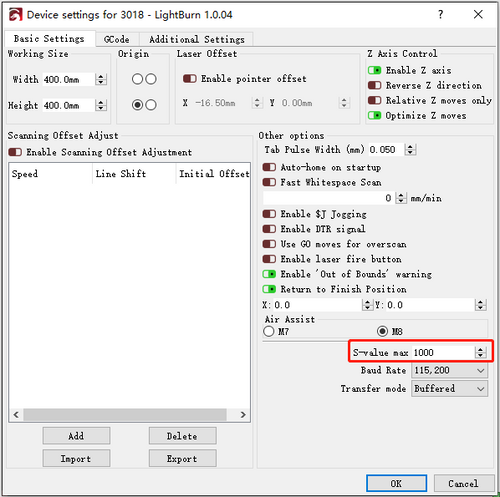
4.1.1. Check the engraving machine machine parameters settings
Check whether the value of "Max spindle speed (RPM), S-Value max ($30)" in "Machine Settings" is set correctly (default 1000), and whether it is consistent with the maximum S value in "Device Settings".
Try resetting the engraver.
4.1.2 Refer to the corresponding model cutting parameters
Check whether the cutting speed and power are set correctly.
Query the cutting data of the corresponding model laser module-Cutting Data
4.2 Hardware troubleshooting
4.2.1 The laser lens is dirty, there is foreign matter between the protective window and the focusing lens or between the laser nozzle and the protective window
Disconnect the cable of the laser module, and use a cotton swab dipped in alcohol to clean the laser lens of the laser module.
Dirty lenses will result in a drop in optical power.
4.2.2 Check the laser beam
Fix the laser module at a distance of 2-3 meters from the white wall, connect the power cord and perform 100% power cutting in the engraving software to check whether the laser beam is normal.
LT-K40
LT-K30
LT-4LDS-V2
LT-80W-AA-PRO
LT-40W-AA


4.2.3 Check wiring
Check whether the connection line is correct, whether the output power of the adapter board is 12V or 24V, and whether the current input to the laser module meets the specified parameters.
|
Laser Module Model |
Power required for full power status |
|
LT-40W-AA |
12V-2A |
|
LT-80W-AA-PRO |
24V-2A/12V-3A |
|
LT-4LDS-V2 |
24V-3A |
|
LT-K30 |
24V-5A |
4.2.4 Check whether the heat dissipation is normal
Check whether the cooling fan of the laser module is working normally.
Temperature affects cutting performance.
4.2.5 power sequence
If you use an adapter board for external power supply, you need to turn on the external power supply before outputting PWM signal when cutting or engraving work.
If the PWM signal is output first and then turn on the power supply, it will cause a power drop and some engraving machines will run briefly for 10S and then recover.